Clinical skills reference · PBS + Medical Interventions
Vital Signs
Learn what you hear, what you see and what the measurement can actually tell you. Keep the sounds, illustrated guides and practice tools together while you build your exam skills.
Your reference, whenever you need it. Start with the guide, try the fictional practice, then return to today's Schoology lesson for the required work. These activities add no submission. Keep actual health information private. Real equipment practice is voluntary and teacher or school-nurse supervised.
Systolic pressure is the arterial pressure associated with the heart's pumping phase. Diastolic pressure is the lower pressure between beats. During manual measurement, you listen to one series of Korotkoff sounds over the arm artery. Its beginning and disappearance identify the two endpoints.
First tapsSystolic, the top number
Final tapDiastolic, at disappearance
mm HgMillimeters of mercury, a pressure unit
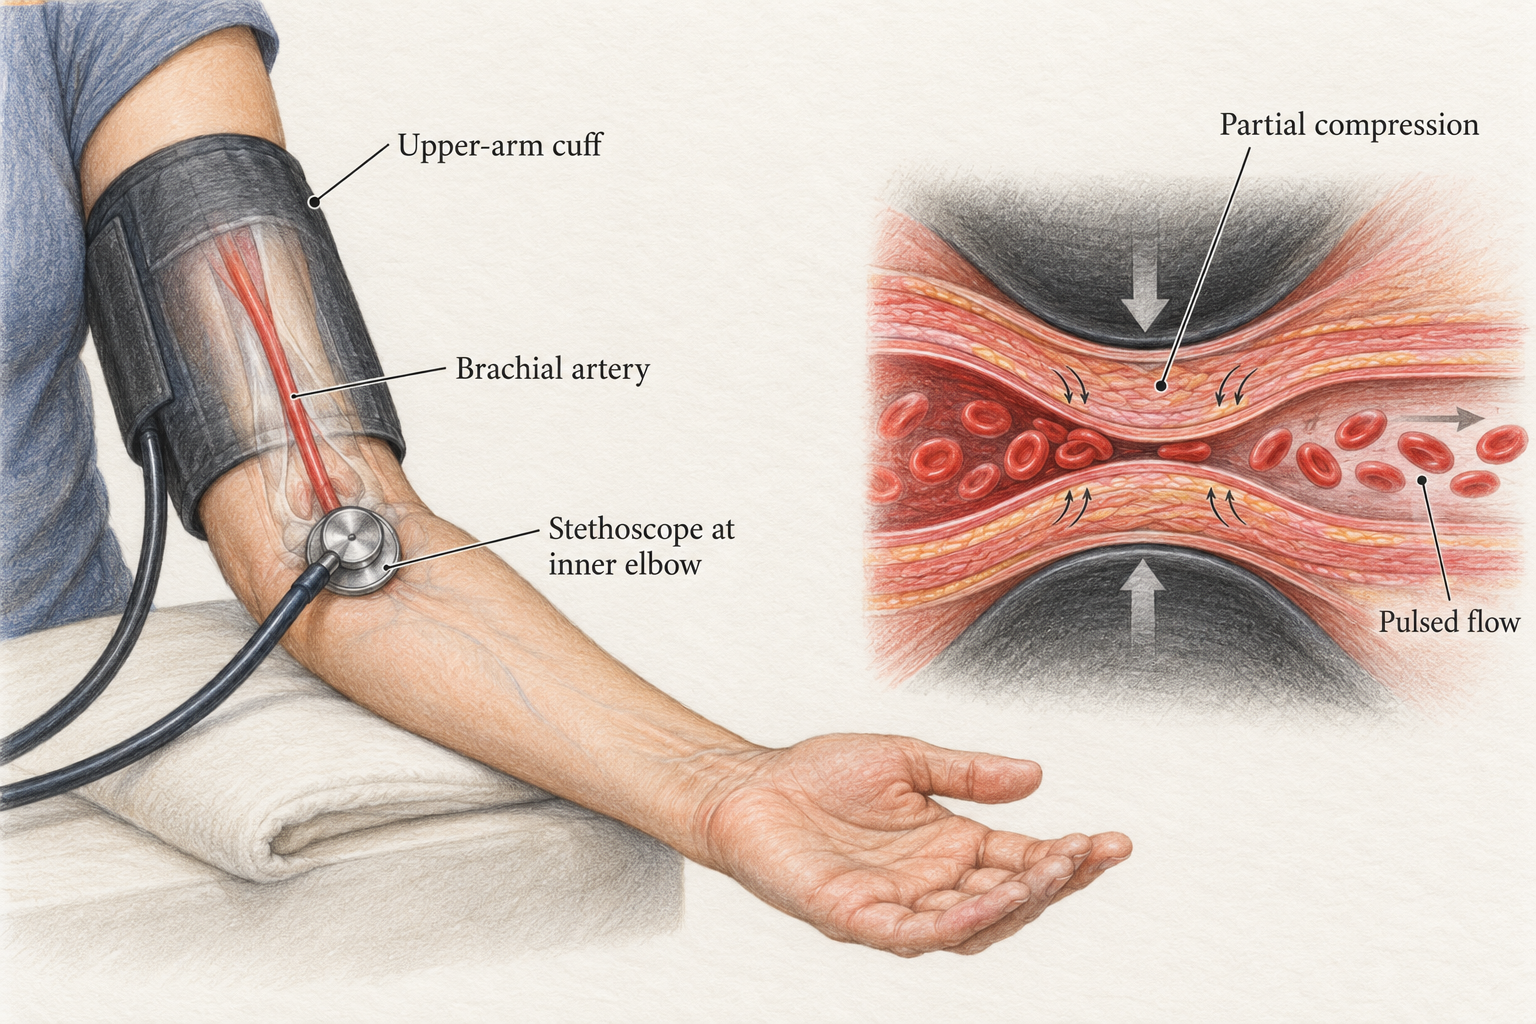
The cuff changes pressure around the upper-arm artery. Listen below the cuff near the inner elbow. The enlarged cutaway illustrates partial compression; it is not to scale. Open the illustration to zoom.
Step 1 of 6
Prepare
Explain the voluntary practice and get permission. Use a correctly sized cuff on the bare upper arm. Have the person rest quietly for five minutes, with back supported, feet flat and arm supported at heart level. Neither person talks during the reading.
Why this matters. Position, activity and cuff fit can change the measured pressure.
Read all steps together
Prepare. Explain the voluntary practice and get permission. Use a correctly sized cuff on the bare upper arm. Have the person rest quietly for five minutes, with back supported, feet flat and arm supported at heart level. Neither person talks during the reading. Position, activity and cuff fit can change the measured pressure.
Estimate. Feel the wrist pulse while inflating the cuff. Note the pressure where the pulse disappears, then fully deflate. Wait about one minute before the listening measurement. This estimate helps you inflate high enough without choosing an arbitrary pressure.
Place and inflate. Place the stethoscope over the brachial artery, the upper-arm artery felt near the inner elbow, below the cuff. Inflate to 20 to 30 mm Hg above the pulse-disappearance estimate. Follow your equipment guide and instructor's demonstration. The artery is initially held closed. An inflated cuff alone does not provide the two final readings.
Hear the first taps. Release pressure slowly, about 2 mm Hg each second. Note the first rhythmic tap, confirmed by a following beat. Read the gauge at that first tap. This is systolic pressure, the top number. Do not wait for the loudest sound. Korotkoff sounds are the pulse-linked sounds heard during cuff deflation. Their first appearance marks the systolic endpoint.
Hear the end. Keep releasing at the same pace. Sounds may swish, grow clearer and become muffled. In the usual adult method, record diastolic pressure at the last audible beat as the sounds disappear. Keep listening another 10 mm Hg to confirm silence, then fully release the cuff. Diastolic is the bottom number. It is not a separate beat. Do not record the later, lower confirmation pressure or use muffling alone as the usual endpoint.
Record and review. Record both values in mm Hg, plus arm, position and relevant conditions. If a sound is unclear, say so and ask the teacher to check your technique. Wait at least one minute before a repeat; follow the instructor's plan. Do not diagnose a classmate from one reading. A useful record describes what was measured and the conditions that could affect it.
Check that the eartips point forward and the correct chestpiece side is open. Keep the chestpiece on bare skin over the located artery, below the cuff. Avoid rubbing tubing, clothing and fingers. Check cuff size and controlled deflation with the teacher. If the sound remains unclear, record that limit and use the model for listening practice. Do not keep reinflating without a rest or guess a reading.
02 · Watch, replay, compare
Hear it with a real recording.
Use comfortable headphone volume. First listen only for the first taps. Replay to find the faint final taps and the silence that follows. Compare the real recordings with the clearly labeled teaching simulations below.
Korotkoff recording 1
Thinklabs digital-stethoscope recording, contributed by Alice Mayfield at Carnegie Mellon. Listen for the first taps and the final faint beat.
The videos remain on their creators' services. The written walkthrough and local practice sounds remain available if a school filter blocks video.
03 · Pulse, breathing, temperature and oxygen
Measure the thing you mean to measure.
Pulse
Pulse is the pressure wave you feel with each heartbeat. With permission and supervision, use two fingertips on the thumb side of the wrist, not your own thumb. Record rate in beats per minute, rhythm and anything that made counting difficult.
Count for a full minute if the rhythm is irregular or your instructor requires it. The practice below uses supplied regular-pulse counts.
Respiratory rate
One rise and fall of the chest is one breath. Observe a resting person with permission, without asking them to change their breathing. Count for a full minute and record breaths per minute, effort and any limits to observation.
Counting breathing and listening to lung sounds are different observations. One does not replace the other.
Temperature
Use the thermometer's instructions, the approved classroom method and required cleaning or disposable covers. Record the value, °C or °F, and the measurement site or device method.
Skin, oral and other methods can give different readings. A feeling of warmth is a reported symptom, not a measured temperature.
Pulse oximetry
A fingertip pulse oximeter estimates blood oxygen saturation, often labeled SpO₂, as a percentage. Follow its instructions, keep the hand still and wait for a stable signal before recording the supplied result and conditions.
Motion, poor circulation, nail products and skin pigmentation can affect accuracy. A reading alone cannot establish whether someone is well. Report concerns to the teacher or nurse.
Turn a count into a rate
This invented regular-pulse record gives you the count. Your job is to express it per minute.
36 beats in 30 seconds
In real practice, use a full minute when the rhythm is irregular or your instructor requires it. A calculated rate does not establish a diagnosis.
These 25 local audio examples are synthesized teaching simulations, not patient recordings. They have not had clinical perceptual validation. Learn timing and sound quality with the illustrated guide; a sound alone does not identify a disease. Heart-valve sounds heard over the chest are different from the Korotkoff sounds heard under a blood-pressure cuff.
Eye and ear examinations add information beyond the traditional vital signs. These related references are gathered here so you can move from listening and observation to the assigned physical-exam station.
Study ear examinations with drawings and models. Do not insert instruments into a classmate's ear or use loud sounds to test hearing. Follow the teacher's directions for voluntary activities.
Local synthesized sounds and original teaching figures: John Hay Biomedical, October 2026. Real recordings: Thinklabs, linked at the original source. No third-party recording is copied into the local sound library.